
This was written by Dave Rayner several years ago and maybe out of date but I will update it ASAP.
![]()
|
It seems that every second person who
joins our club is a little apprehensive
about the 650 and that’s
understandable to a certain extent. Some
have ridden only modern bikes and now
want to try their hand at restoring
something a little bit
"classic" - maybe of the same
make as their R-1 or XJR-13. But those
bikes run like Swiss clocks and handle
as if they’re on rails while their
newly acquired 650 runs like a dog if it
runs at all, and is all over the road.
"What are those things under the
chrome cover on the left side of the
head anyway? Never seen anything like
that before". Others may have owned
an XS when they were new but sold it for
whatever reason and now have the urge to
relive a part of their youth. Trouble
is, the 650 is not the same now as it
was then. The bike like the one these
people bought off the showroom floor and
never had any trouble with is now
somewhere between 24 and 35 years old.
Not only that, but God knows how many
owners it’s had and what it’s been
through. Things that they once thought
nothing of are now giving them
headaches. As for those who’ve bought
a 650 as their very first bike, let’s
not even go there...............
It should be pointed out that when Yamaha began designing the 650, they had not been making bikes all that long. Sure, their bikes were good in their day but with this one, they really were breaking new ground. The 650 was their first bike over 350cc and their first four stroke. Though they are our favourite bike in all the world, they do have their shortcomings. Some were a result of late ‘60s technology while others were due to economics. Some are merely our perception of what’s acceptable these days and what’s not. Would you buy a model T Ford and complain about the gas headlights and wooden spoke wheels and change them for electric lights and alloys? You could, but you probably wouldn’t. You probably wouldn’t have it as your only car and drive it every day either. You might have in 1930, but not now. Whatever the reasons, many new owners seem to have a hard time coming to terms with these perceived shortcomings and annoyances and often ask if anything can be done to improve the bike and make it more reliable, user friendly, better handling, etc. The short answer is yes, yes, and yes. But, how much of the bike needs improvement? Which is most important? How much will it cost? Will it change the look of the bike? Is it worth doing? Way back in around 1980, a fellow named Joe Minton wrote a piece called "Building a Better Twin" for a major motorcycle magazine. It dealt solely with improving the 650’s performance and handling and has become the "bible" on the subject. When it was written, the bike was still in production, spares were plentiful, dealers were keen to keep them on the road, and even the oldest 650s were barely showing their age. A lot has changed since then. These days, Yamaha has long since stopped making many parts for the 650, dealers would much prefer you bought a new Yamaha, and even the youngest 650 (unless it’s had a very easy life) is worn out. This then, is entirely different to Mr. Minion's article. Rather than hot rodding a contemporary bike, we’ll deal with restoring or modernising an ageing bike to make it more rideable and enjoyable in today’s world.
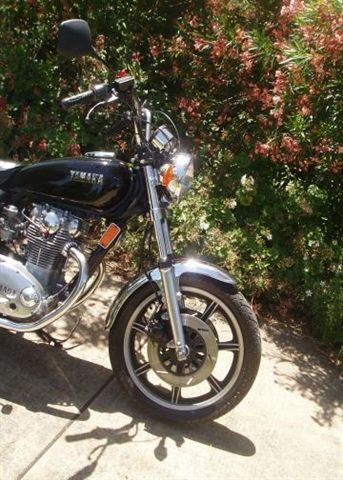
Almost every part of the bike can be improved or modified in some way. "Modified" doesn’t mean changing the bike into a chopper, hot rod, or anything of the sort. For our purpose here, it means "changing a part of the bike for the better". For those who want it though, there’s a little go-fast info here as well. Here is a list, albeit probably incomplete, of what can be done to the bike to improve it in some way. The parts of the bike - front end, frame, etc. are not in any particular order but the changes that can be done to each are. They’re listed in order of how much they change the look of the bike, how expensive or complex they are, and go from least to most. Names and contact details of suppliers are given just once, and their name only after that. Prices and part numbers are given if known. Front End - No change to appearance; Modify the damper rods. Do it yourself and it costs nothing. There are two holes in the bottom of the damper rod. Drill two more. There is one hole in the top of the rod. Drill through to the other side to make two holes. Fit progressive fork springs and cartridge emulators from Geoff's XS. If the fit of the tubes in the lowers is loose, have the tubes hard chromed. Many shops can do this and it costs around $200. Take your lowers so the chromer can take a measurement. Replace the ball bearings in the steering head with tapered rollers from Geoff's XS. Also available from most wreckers and accessory shops. Made by Link, part # 90 130 03. They cost around $75. Minor change to appearance; Steering damper from Geoff's XS, Fork bracket (35mm only) for the damper is also available from Geoff's XS. Fit forks off a Yamaha of the same period. XS-750s had 36mm tubes and XS-1100s had 37mm tubes but they look almost identical and take all the same hardware (brakes, etc). It’s almost impossible to bore out the stock triple clamps so you’ll need those too. You may have to graft the 650’s stem into the bottom clamp. Major change to appearance; Front end off a completely different bike, eg: upside down forks.
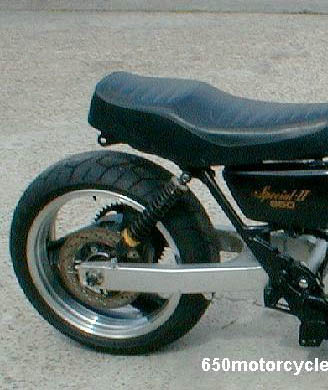
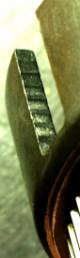
650 with front end off a Kawasaki 1100. Rear End - No change to appearance; Bronze swing arm bushes from Peter Kommer Roller bearings from Geoff's XS. The stock swing arm needs a grease nipple in the spindle tube. The nipples in the ends of the bolt do not allow grease to get to where it’s needed. This is a design fault that was never rectified. The swing arm bolt is reduced at the thread and has been known to break off. Geoff's XS has a replacement that’s full sized at the thread and comes with a Nylock nut. Have shocks rebuilt by SOS.
Note standard swing arm bolt below which has reduced thread section which is known to break off Minor change to appearance; After-market shocks. Fit an underslung brace to the stock swing arm. Frame shops like Laurie Alderton in Sydney and Bob Martin in Melbourne can do this.
Stock swing arm with an underslung brace. Hardly noticeable behind stock mufflers. Major change to appearance; Swing arm off another bike. A few that have been fitted to 650s are Yamaha FZR-400, XJR-1300, Suzuki GSX-1100, Kawasaki GPz-750. Yes, there are several 650s running around with mono shock suspension.
650 with box-section, aluminium swing arm off some other bike. Even if it fits the frame, be sure to pay attention to the length as some are way longer than others. Brakes - No change to appearance; Rebuild brakes and make sure all parts are OK. Machine discs/drums and use good quality pads/shoes. Pistons can rust. If yours are rusty, replace with stainless steel items from Lance Stewart. Ph (H) 02-98213281or you can also use slotted rotors from a XS1100 Like Bill Wallis has on his '82 special.
Minor change in appearance; Drill discs. Can do yourself if you have a drill press with a very slow speed. Otherwise, SOS or any machine shop can do it.
Mike has fully-floating, drilled front discs #30-3065. Fit stainless hose. Does not expand like rubber hose so all the effort applied to the lever gets to the disc. Be sure to ask for street legal hose. It’s expensive, but worth it. Mike has a full range of brake parts, rebuild kits and stainless hose. The plastic reservoir on the master cylinder can discolour and crack. Lance Stewart makes a replacement from aluminium billet for the early, round type.
An all 650 front end (except mudguard) but with dampers modified, Progressive Suspension springs, a billet fork brace, drilled disc, stainless spokes and stainless brake hose. Master cylinder in alloy made by Lance Stewart at Billroy engineering Major change in appearance; Brakes off a different bike eg; wave discs with 6 piston calipers. Wheels - No change to appearance; Tighten wire spokes and check wheels for trueness. Minor change to appearance; Fit whichever stock wheels you like from another model 650 (wire with steel rims - 36 or 72 spokes, wire with aluminium rims, or cast). Replace wire spokes with stainless steel. Major change to appearance; Fit wheels off another bike. These days, the best tyres are made for 17" wheels. Frame - Minor change in appearance; nothing really. Some owners weld in gussets and braces but the frame itself (at least the TX-A and later) is not the problem. Major change in appearance ; Aftermarket frame. There are plenty and we have a full list. You could also use the frame from another bike although you’d probably buy the complete bike (or complete minus motor) and fit the XS motor to it. It’d be more of a re powered whatever and less of a modified XS. Still, it’s been done many times.
650 with complete Yamaha R-1 chassis. (It’s really a repowered R-1.) Fuel Taps - No change to appearance; Rebuild with new washers and seals. Geoff's XS has a full range of rebuild kits. Minor change to appearance; Replace vacuum taps on Specials with Geoff's XS gravity type (stock early type won’t fit) Fuel Tank - No change to appearance; Remove rust by electrolysis or molasses but the leave the inside bare metal. Better still is to do the foregoing and have the inside of the tank coated with Kreem or Kwik-Poly available from accessory shops. Minor change to appearance; Change tank for one off another 650. XS-1 to TX interchange. TX-A to ’81 Special interchange. Can be done just for looks but usually for an increase in fuel range. XS-1 to XS-2 holds 12.5l. TX holds 14l. TX-A to ‘79F holds 15l. Specials hold 11.5l. Major change to appearance; Fit tank off another bike. Seat - No change to appearance; The original steel base rusts into oblivion. Have it galvanized if it’s still OK or replace with a fibreglass item from Peter Kommer . Minor to major change to appearance; Have the seat shaped and trimmed to your liking. Charging System (the cause of untold heartache) - The stock system is a temporary magnet alternator which is switched on and off as required to keep the battery charged and is governed by a mechanical voltage regulator. The alternator brushes are a wear item and the rotors can and often do fail. No change to appearance - Stay with the stock system but check/replace alternator brushes. Mikes part # for XS-1 to ’79 is 24-2650. Part # for ’80 & ’81 is 24-2651. Have the alternator checked for output and replace or have rewound if necessary. His part # for a rotor puller is 35-0040, but you’ll need it first. You might have to buy one from Yamaha here. Don’t attempt to remove the rotor without the correct tool. Small Coil Rewinds of 50 Edols St, Nth Geelong VIC 3215 will rewind the rotor. Ph 03-57288454. Replace the regulator with a Bosch RE-55 unit (Ed’s note - in the last issue it was said that the Bosch RE-55 is a regulator/rectifier. That is incorrect. It’s only a regulator.) available from any auto electrician. After all that, you’ll have a stock system in top shape but a flat battery will still leave you stranded. To avoid that, you could use an entirely different system. Replace the alternator and regulator with one from an RD/RZ- 250/350/400. This is a permanent magnet alternator which does not switch on and off but runs all the time. It’s voltage regulator still cuts in and out as required but instead of turning the alternator off, it simply radiates the current out as heat. This system has no brushes to wear out and will run with a flat battery or even no battery at all. There is a little work to make it fit but nothing too hard. RD/RZs were a very popular bike and should be no problem to find at a wrecker. Check online as there are several maker of Permanent Magnet Alternator (PMA) systems for the XS650
RD/RZ stator & rotor on a 650 engine. Never be stranded by worn brushes or a flat battery again. Ignition - No change to appearance; The original ignition is useless and should be thrown away. Replace with Probe or Boyer. Small Coil Rewinds offers a high output coil or you can opt for a Dyna for considerably more. You need one dual-output coil. The Boyer does away with the mechanical advance, comes with it’s own coil, from 650-XSories at 19 Thornbill Cr, Glenmore Park NSW 2745. Ph 0409384790, e-mail dave650@bigpond.net.au They are not made for rephased engines. If you have a rephased engine you’ll need the Probe ignition The Probe ignition which is designed specifically for the 270 or 277 degree rephased motor is only available from Probe engineering Major change to appearance; Fit a Joe Hunt or ARD magneto or any other ignition that mounts externally.
650 with magneto ignition on the end of the camshaft. (Notice the RZ-500 wheels & brakes as well.) Carbs - No change to appearance; The 650’s carbs are CV units which have diaphragms, butterflies, and throttle shafts. Like all things made of rubber, the diaphragms can perish and crack (If you still had the condom your older brother gave you when you were 16, would you use it today? - Ed) making the carb useless. There are two ways to test them. Take the air filter off, reach in to the carb and lift the slide all the way up. Cover the small crescent shaped opening at the top of the carb’s throat with your thumb making sure you’ve sealed it, and let the slide go. If it falls, the diaphragm has a leak. Another way is to take it out and hold it up to the light. If you see the tiniest hole or crack, it needs replacing. Don’t bother trying to glue or patch it. The throttle shaft can wear where it passes through the carb’s body, causing it to suck air in. To test for this, start the motor and let it warm up. Spray some Aerostart around where the throttle shaft passes through both sides of both carbs. Have the air filters on to stop the Aerostart being sucked in the throat. If the motor revs up, there’s a leak and you need a rebuild kit. Geoff's XS has a full range of carb parts. Early diaphragms part # 20-6029. Late is # 20-6028. Like the diaphragms, the carb holders are made of rubber and can perish and crack. When this happens they suck in air causing the motor to run lean and no amount of carb tuning will fix this. Mike has early 38s # 48-1480 and late 34s # 20-6038. The plugs for the air barb on the lates is # 48-1447. The rest is too extensive to list here. Also check JBM Industries for replacement diaphragms Minor change to appearance; Install Mikuni slide carbs, round or flat. Available from many sources on the web or in Australia from Ian Williams Tuning. 79 Torrens Rd, Brompton, SA 5007. Ph 08-83409288. Fax 08-83409277. E-mail iwt@iwt.com.au Slide carbs have no diaphragms to perish or throttle shafts to wear. Shop around, the prices in the US are very competitive and look for carbs that are already jetted for the XS and come as a complete bolt on kit. Mikuni 34mm roundslide
carbs have no diaphragms or throttle
shafts. Set shown are left and right
carbs, note idle adjust screws facing
out. Goran Perrson's set-up with joining
rod for stability. Major change to appearance; Fit a supercharger with a downdraught Webber and bug catcher. Pipes - No change to appearance; Many chrome platers don’t like to do used exhaust pipes because the carbon inside them contaminates their tanks. Even if you plug the ends, there’s always the chance a plug will come out. If you find a chrome shop that will do them, fine. If not, have pipes made to the same design but with a single skin. Pipes should be mandrel bent only. You can also make your own using bends, straights, and doughnuts from any exhaust shop. The headers for a Special are very difficult to replicate as they are one long bend with a varying radius. Slight to major change to appearance; Have pipes made to any design you like. Frank Trost and Peter Kommer do headers. A wide range of mufflers is available from most accessory shops. They range from cheap Taiwanese jobbies to stainless steel works of art.
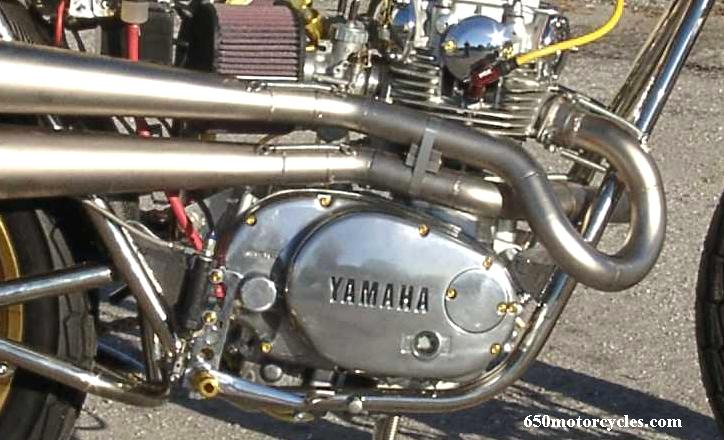
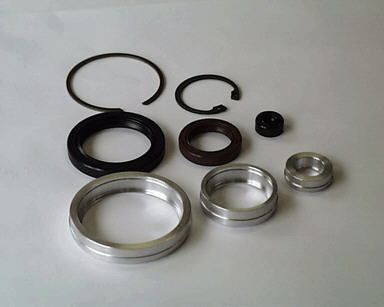
All manner of exhausts can be fitted to a 650. Engine - No change to appearance - Cylinder; Rebore with oversized 650 pistons. For performance, increase to 750 or 840cc with 650-XSories kit. Head; Have serviced with stock parts. For performance, have cam reprofiled. Have head ported and polished. Bigger valves in stainless with bronze guides. Crankcase; The three oil seals on the left side of the crankcase are Yamaha-specific, cost plenty, and are almost impossible to change unless the cases are split. Lance Stewart at Billroy Engineering makes adapters which allow easy fitment of industry-standard seals. Adapters for seal kits, left is the open case set, right is the closed case set
One piece clutch rod Clutch - No change to appearance; Check stock plates and springs and replace as necessary. Sandblasting the steel plates will increase hook up but wear the fibre plates quicker. The pushrod and bushing can wear. Lance Stewart makes a one-piece rod that’s hardened at both ends and a bush. Use stronger springs and Kevlar plates from 650-XSories. The shock absorber springs can break. Replace with 650-XSories spring/block kit.
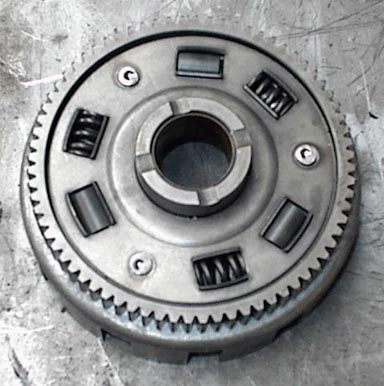
Clutch with vescanite blocks and stronger springs in the shock absorber. After years of the power being rolled on and off, the tabs on the fibre plates can make indents on the dogs of the clutch basket. The severity of this is a good indicator of how hard the bike has been ridden and the worse it is, the more difficult engagement/disengagement will be as the uneven surface impedes the sliding action of the plates.
Clutch basket with severely worn dogs. The only fix, aside from a new basket or at least a used one in better shape than the one you have, is to very carefully file the dogs smooth. However, only a whisker can be removed as too much will increase the clearance of the plates in the basket and give a "clunk" every time the throttle is opened or closed. Also, you must try to take the same amount off each dog so the load is still evenly shared by all the tabs and dogs.
Clutch basket with worn dogs filed smooth (or at least smoother than it was). The thrust bearing has a washer on both sides of it. The manual, and even Yamaha’s parts book shows only one but there should be two.
Yamaha’s, Clymer’s, and Haynes’ drawing of the clutch. Note only one thrust bearing washer. If yours has only one, it’s a fair bet a previous owner has had the clutch apart and put it back together according to the manual. Yamaha released an amended drawing many years later.
Amended diagram of the clutch with two thrust washers. The screws that hold the pressure plate on have Phillips heads and if they’ve been off and on a few times the heads are probably damaged. If yours are, you can use Allen screws with adapters made out of aluminium billet.
Allen screws with adapters in place of original Phillips screws. Whichever you use, when you install them use an impact driver. Sight change to appearance; Use hydraulic actuation or pull mechanism.
Hydraulic clutch but still pushed from the left side.
Cable clutch but pulled from the right side. The mechanism is normally covered. Major change to appearance; Dry clutch. This involves heavily modifying the clutch cover. Once done, clutch can be covered or out in the open but either way is separate from engine oil. Benefits are; No oil on plates - much better hook up, no friction material in oil, clutch friction does not add to engine oil temp, easy to service, can have any number of plates by making a new hub. In short - the best thing you can do for the clutch but only for the very serious.
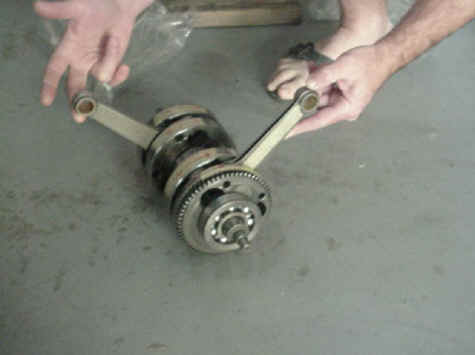
Clutch cover modified for a dry clutch. Electric Starter - No change to appearance; The starter motor itself is fine. Most problems are with the engagement of the gears caused by a weak Bendix spring. If your gears are OK, you need only the uprated spring from Lance Stewart. If the Bendix gear is shot, you need Mikes part # 24-6522 . Crank - Rebuild crank with stock or high performance rods from Mike. Stock is # 05-0010. High performance (cast rod of heavier section with extra rollers in bearing) is # 05-0005. Rephase to 90 degrees with shaft from Professional Motorcycle Tuning of 8a Rodd Rd, Airport West VIC. Ph 03-93304909. Ask for Daryl. You’ll also need a cam and ignition to suit. Carrillo rods (entirely different to Mike’s high performance rods) from 650-XSories. Have crank balanced to suit whatever you’ve done.
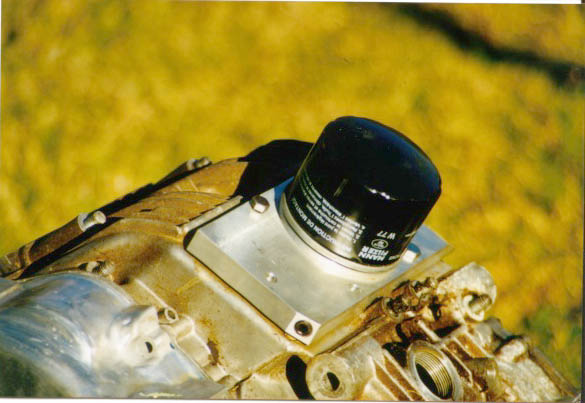
Rebuilt crank rephased to 90 degrees, balanced, and polished all over. Mike’s rods are more than OK but this one has Carrillos. Oil Filter - No change to appearance; The stock filters are nothing more than gravel strainers and the lower one is prone to tearing. Fit Mike’s filter # 15-6500. It’s reinforced but still only a gravel strainer. Minor change to appearance; Fit external filter from 650-XSories. Major change to appearance; Fit remote filter connected by hoses. In any case, filters can be damaged by having thick oil forced through them faster than the filter will allow. This is caused by owners starting the engine and revving it hard and/or riding off straight away. The engine must be run at a low speed until it warms up and the oil has thinned. Start your bike first and let it idle while you push it out of the garage, put on your jacket and helmet, and shut the door. Don’t push it out, put on your jacket and helmet, shut the door, then start the bike and ride off at full speed. To an oil filter, it makes all the difference in the world. Mike also has a high volume oil pump the moves 50% more oil per revolution. Great for engines that see very hard use or operate in hot climates. Part # 05-0044
External, spin-on oil filter. Air Filter - No change to appearance; Replace stock element in stock air box. Mike’s part # for XS-1 & XS-1B is 15-0651, XS-2 & TX is 15-0652. TX-A & ‘75B is #15-0654. ‘76C to ’79F & SF is #15-0653. ‘80SG & ‘81SH is #15-0655. If you prefer pods, K & Ns are the best (use the absolute biggest that will fit in the space). Nuts & Bolts - minor change to appearance; Most of the fasteners on the 650 are mild steel that’s zinc plated while some are high tensile steel. For the sake of appearance only, most can be replaced with stainless steel which are available from specialty nut and bolt suppliers or Peter Kommer who has them in sets, eg; clutch cover, alternator cover, etc. However, stainless nuts and bolts over 8mm are generally only available with a coarse thread while some of the 8mm+ fasteners on the 650 (eg; footpeg brackets) have fine threads. When the nut and bolt supplier tells you which ones they can’t supply, contact http://www.inoxfasteners.co.uk/ for those. Also for the sake of appearance, dome or acorn nuts look much better than plain hex nuts with a length of thread visible. Stainless steel galls in aluminium and also against itself. Therefore, always use Anti Seize with stainless fasteners. So there you have it. There’s a lot that can be done to improve the reliability, ease of maintenance, and performance of a 650 whilst still keeping it looking original or as close as possible to it. Of course, you can go radical too if you wish. To sum up, the 650 is getting old and it’s not much fun owning a bike that coughs and farts, is all over the road, and that you won’t take out on a ride with your mates because you’re too afraid she’ll let you down. To really enjoy it, you need to do at least some of these things. Which one’s are most important is up to you but some lead into others and some negate others. Think carefully before spending money but one thing’s for sure - a 650 with all this or just most of it is still way cheaper than the latest plastic bike and infinitely more fun to ride.
05/05/2015
|